It’s 2022 and this article is partly outdated. You now have to set two IPv4 routes since part of the address space has been sold. Everything else should still work just fine.
ENGLISH VERSION BELOW
Ich wollte unbedingt ins Hamnet. Komfortabel per WLAN mit all meinen Geräten. Also habe ich meinen Router mit OpenWRT so eingerichtet, dass er sich mit dem VPN verbindet. Denn eine HF-Verbindung habe ich leider nicht.
Allerdings gibt es dabei noch ein paar Sachen zu beachten.
Ich werde jetzt nicht auf das einrichten einer VPN-Verbindung eingehen, sondern nur darauf, was speziell für das Hamnet notwendig ist. Für das einrichten einer VPN-Verbindung gibt es genug Anleitungen. (Aber ppp-mod-pptp muss installiert sein.)
Nachdem das VPN eingerichtet wurde, muss erst einmal die Firewall Zone geändert werden. Stelle sie z.b. auf „HamnetVPN“. Dazu gibst du bei unspecified -or- create: einfach „HamnetVPN“ ein. Danach muss in der Config-Datei /etc/config/network die Zeile option auth 'pap' hinzugefügt werden, denn die Verbindung wird unverschlüsselt aufgebaut. OpenWRT versucht standarmäßig das verschlüsselte CHAP zu nutzen. Am einfachsten kann die Datei mit nano editiert werden. Falls noch nicht installiert, wird das mit opkg update gefolgt von opkg install nano getan.
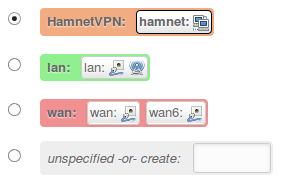
Die Firewall-Zone „HamnetVPN“.
Die Datei öffnen wir nun mit nano /etc/config/network und fügen die Zeile hinzu. Danach sollte unser Eintrag so aussehen:
config interface ‚hamnet‘
option proto ‚pptp‘
option server ‚ruhrlink.dyndns.org‘
option password ‚q<$djre9sk#)2zTB‘
option auth ‚pap‘
option username ‚dc7ia‘
option defaultroute ‚0‘
Natürlich ist das Passwort nicht echt! 😉
(Die Reihenfolge der Optionen ist egal.)
Wir speicern mit Strg+O und schließen mit Strg+X.
Anschließend müssen wir die Datei /etc/ppp/options.pptp editieren. Dort fügen wir nomppe hinzu. Die Datei sieht dann so ähnlich wie diese aus:
noipdefault

noauth

nobsdcomp

nodeflate

idle 0

# mppe required,no40,no56,stateless

maxfail 0

refuse-chap

nomppe
Die Zeile, welche mit mppe beginnt, muss wie oben mit dem # auskommentiert werden. Dann speichern wir und starten den Router neu. Jetzt müsste man unter Interfaces sehen, dass das VPN eine 44.*-IP-Adresse bekommen hat:

Das Hamnet-VPN ist erfolgreich verbunden.
Anschließend muss noch die statische Route gesetzt werden:

Die statische Route unter OpenWRT eingerichtet für das 44.0.0.0/8 Netz.
Diese statische Route bewirkt, dass die Pakete fürs Hamnet auch dahin kommen, und nicht ins Internet geschickt werden. Dies machen wir unter Network -> Static Routes.
Jetzt sollte dein Router dir das Hamnet über WLAN und LAN zur Verfügung stellen. 🙂
Denke aber daran, dass du deine VPN vor unbefugter Nutzung schützen musst. Dein WLAN sollte verschlüsselt sein.
Vielen Dank an Florian, DF2ET. Er hat mir gut geholfen. So doll, dass es nun funktioniert. 🙂
ENGLISH
(Hint: Ask for the VPN vpn@ruhrlink.org )
I really wanted to use Hamnet. Comfortable via Wi-Fi with all my devices. So I have set up my router with OpenWRT so that it connects to the VPN automatically. I can’t use RF because I don’t see the repeater.
However, there’s still a few things to note.
I will not go into detail how to set up a VPN connection, but only to what is specifically required for the Hamnet. For setting up a VPN connection there is enough instructions online. (But make sure you have ppp-mod-pptp muss installed.)
After the VPN was set up once the firewall zone needs to be changed. For example, set it to „HamnetVPN“. Just type in field unspecified -or- create: the name of the firewall zone, for example „HamnetVPN“. Then you have to change the Config-file /etc/config/network and add line option auth 'pap', because we neeed an unencrypted connection. OpenWRT tries to use encrypted CHAP as default. The easiest way to edit this file is to use nano. If not installed yet that can be done with opkg update and opkg install nano.
The code firewall zone „HamnetVPN“.
We open the file using nano /etc/config/network and add the line. Then our entry should look like this:
config interface ‚Hamnet‘
option proto ‚pptp‘
server option ‚ruhrlink.dyndns.org‘
option password ‚q<$djre9sk#)2zTB‘
auth option ‚pap‘
option username ‚dc7ia‘
option default route ‚0‘
Of course is it not my real password! 😉
(The order of options does not matter.)
We save with Ctrl + O and end with Ctrl + X .
Then we need to edit the file /etc/ppp/options.pptp . There we add nomppe . The file will look something like this:
 noipdefault

noauth

nobsdcomp

nodeflate

idle 0

# Mppe required, no40, no56, stateless

maxfail 0

refuse-chap

nomppe
The line beginning with mppe must be commented out as above with the # . Then we save and restart the router. Now would you see at menu point "interfaces" that the VPN has a 44.* IP address.
The code Hamnet VPN is connected successfully.
The static route must be set:
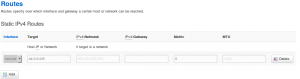 The code static route set up under OpenWRT for the 44.0.0.0/8 network.
This static route causes packets for Hamnet also to get to, and not be sent to the Internet. We do this under Network – & gt; Static Routes.
Now your router you should give you Hamnet access via WLAN and LAN. 🙂
But remember that you need to protect your VPN from unauthorized use. Your WLAN should be encrypted.
Thanks to Florian, DF2ET. He helped me well. So great that it works now. 🙂


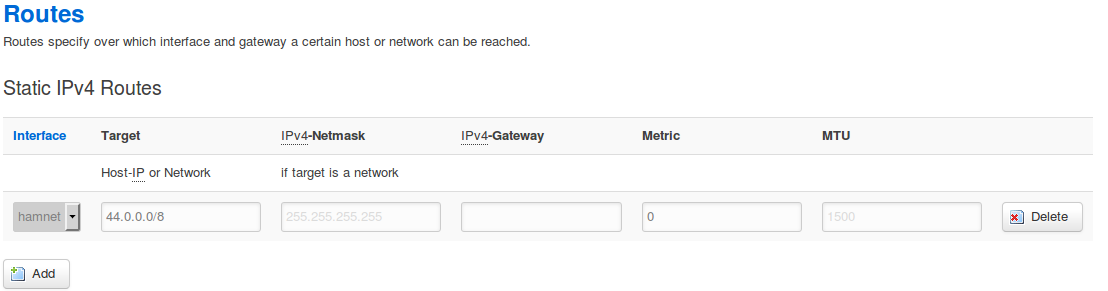 The code static route set up under OpenWRT for the 44.0.0.0/8 network.